Appetizers
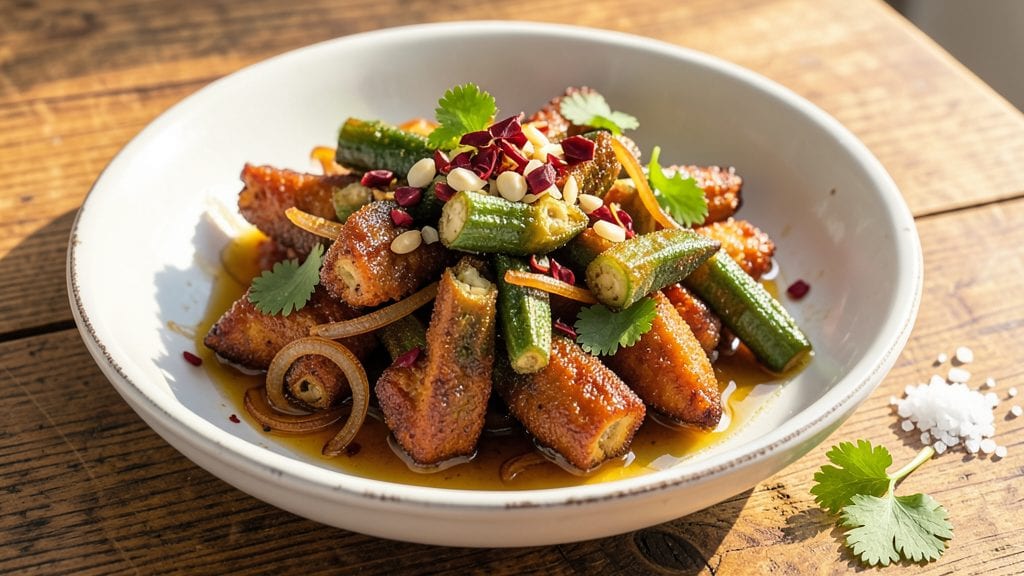
This fried pickled okra recipe transforms humble okra into crispy-tender bites with a tangy zing that elevates any meal. The process combines two techniques—pickling for bright acidity and frying for irresistible crunch—creating a contrast that’s impossible to resist.
I developed this recipe after discovering how much better okra tastes when properly prepared, and the results speak for themselves.
The key to success lies in the pickling process first: okra soaks in a vinegar brine that tenderizes it while adding sharp, refreshing flavor. Once properly pickled, the okra is fried until golden and crispy, striking the perfect balance between crunchy exterior and tender interior.
This method ensures every bite delivers both texture and flavor in perfect harmony.
What you’ll end up with is a dish that’s equally at home as a side for sandwiches, a topping for salads, or a snack with dips like ranch or spicy mayo.
The crispy edges give way to a slightly chewy center, all while the tangy pickling brine adds a bright, refreshing kick. It’s the kind of recipe that turns a simple vegetable into something extraordinary.
Ready in about 30 minutes of active prep plus pickling time, this recipe is perfect for meal prep or serving fresh. The pickling can be done ahead, making it a convenient option for busy weeknights. Here’s how to achieve that perfect balance of crispy and tangy every time.
Ingredients for fried pickled okra
Crispy-tender okra starts with these 12 ingredients—simple but game-changing for texture and zing.
| Ingredient | Amount | Notes |
|---|---|---|
| Fresh Okra 🥬 | 1 ½ lb | Trimmed ends, medium pods |
| White Vinegar 💧 | 1 ½ cups | Distilled for best results |
| Water 💧 | 1 ½ cups | Filtered preferred |
| Salt 🧂 | 2 tbsp | Kosher or sea salt |
| Garlic Cloves 🧄 | 4 cloves | Minced for pickling brine |
| Red Pepper Flakes 🌶️ | 1 tbsp | Adjust for heat preference |
| Vegetable Oil 🫒 | 3 cups | High smoke point preferred |
| Cornstarch 🌾 | ½ cup | For crispy coating |
| All-Purpose Flour 🌾 | ¼ cup | For extra crunch |
| Lemon Juice 🍋 | 1 tbsp | Freshly squeezed |
| Fresh Dill 🌿 | ¼ cup | Chopped for garnish |
| Black Pepper 🌶️ | ½ tsp | Freshly ground |
The okra is non-negotiable—fresh, firm pods with vibrant green skin are a must. Local farmers markets or the produce section at Whole Foods usually have the best quality. Trim the ends right before pickling so they stay crisp. For the vinegar, distilled white vinegar gives the cleanest tang, but apple cider vinegar adds a fruity note if you prefer that. The red pepper flakes? Trader Joe's carries a great blend—just check the heat level on the package.
No cornstarch? All-purpose flour works in a pinch—just use twice the amount. Short on dill? Fresh parsley or cilantro adds brightness too. The pickling brine can be made ahead, but if you're in a hurry, store-bought pickling spice from Penzeys saves time. For extra crunch, double the cornstarch—it's worth the effort. And if your oil gets too hot, let it cool slightly before frying to avoid soggy okra.
Pickled okra keeps in the fridge for up to 2 weeks—perfect for meal prep. Once fried, serve immediately for maximum crunch, but leftovers reheat beautifully in a 350°F oven for 5-7 minutes. Store fried okra in an airtight container with a paper towel to absorb moisture. These bites freeze surprisingly well too—just fry straight from frozen for 2-3 minutes extra. Trust me, the crispy-tender combo is worth the prep!
Why You'll Love This Recipe
- No-Chop Necessary: I swear by this trick—just slice the okra into even rounds (no fancy dicing) and let the vinegar brine do the work while you prep the rest. Honestly, the hardest part is waiting for the garlic to infuse.
- Crispy-Tangy Magic: That first bite? The vinegar’s sharp bite meets the garlic’s warmth, then the oil-fried okra delivers a texture you won’t find anywhere else—crunchy outside, tender inside. (Yes, even on a Tuesday night.)
- Potluck Star: Bring this to a gathering and watch it disappear—it’s the side dish that doesn’t overpower but still gets raves. The pickled flavor holds up for hours, so you can fry it fresh or serve it straight from the jar.
- Pantry Goldmine: A jar of this lasts weeks, and the ingredients? You’re probably already using them. Salt, vinegar, garlic—basic stuff that somehow becomes the secret weapon in your freezer or fridge for lazy days.
Step-by-step instructions for crispy-tender fried pickled okra
This method delivers perfectly crispy, golden okra with a tangy, tender bite every time—no soggy or rubbery results!
Prepare the Pickling Brine
In a medium saucepan, combine the 1.5 cups white vinegar, 1.5 cups water, 2 tablespoons salt, 4 minced garlic cloves, 1 tablespoon red pepper flakes, and 1 tablespoon lemon juice. Bring to a boil over medium-high heat, stirring until the salt fully dissolves. Reduce heat to low and let it simmer for 5 minutes—this develops the flavor base. Remove from heat and let cool completely to room temperature. The mixture should be slightly spicy and tangy, with the garlic and red pepper flakes fully incorporated.
While the brine cools, trim the ends off the 1.5 pounds fresh okra and slice into ½-inch rounds. This size ensures even cooking and maximum crispiness. Don't skip trimming—the tough ends ruin the texture. Place the sliced okra in a large bowl and pour the cooled brine over it, making sure every piece is submerged. Let it marinate for at least 30 minutes (or up to 2 hours for deeper flavor). The okra will absorb the tangy, spicy liquid, giving it that signature zing.
Create the Crispy Coating
In a shallow bowl, whisk together the 0.5 cup cornstarch and 0.25 cup all-purpose flour until fully combined. This blend creates the perfect crispy texture—cornstarch for crunch, flour for structure. Add 0.5 teaspoon black pepper and mix well. Drain the okra from the brine, shaking off any excess liquid, and transfer it to the bowl with the cornstarch mixture. Toss gently but thoroughly to coat each piece evenly. You want a light, even layer—don't pack it down or the coating won't crisp properly.
Let the coated okra rest for 10 minutes at room temperature. This step is crucial—it allows the cornstarch to fully adhere to the okra, ensuring maximum crispiness when fried. While it rests, heat 3 cups vegetable oil in a deep skillet or Dutch oven over medium heat until it reaches 350°F. Use a thermometer for accuracy—oil that's too cool will make greasy okra, and oil that's too hot will burn the coating before the okra cooks through.
Fry to Golden Perfection
Working in batches to avoid overcrowding, carefully add the coated okra to the hot oil. Fry for 2-3 minutes per batch, turning occasionally, until the okra is deep golden brown and crispy on all sides. The key here is patience—rushing will leave it pale and doughy. You'll know it's done when the coating stops sizzling and the okra releases easily from the oil. Drain on a wire rack or paper towels to remove excess oil. The okra should be crispy on the outside and tender on the inside—no chewiness allowed!
While the okra is still hot, transfer it to a serving platter and sprinkle with 0.25 cup chopped fresh dill. The dill adds a bright, herby contrast to the tangy, spicy flavors. Serve immediately with extra pickling brine on the side for dipping—this keeps the okra crispy and lets everyone adjust the heat to their liking. The combination of crispy, tender okra with that tangy, spicy kick is what makes this recipe absolutely irresistible!
Pro Tips For Making Fried Pickled Okra
- TRIM THE OKRA SLIGHTLY: Don’t skip this—just a quick slice off the stem end and a shallow cut down the middle (about ¼ inch deep). I used to fry whole pods and they’d split messily mid-fry, ruining the crispy texture. A small cut lets the pickling brine work deeper, and the slices stay intact.
- USE COLD BRINE, NOT HOT: Let that vinegar-water mix cool completely before submerging the okra—room temp or warmer and the pods will turn mushy. I learned this the hard way after a batch turned into sad, limp okra. Cold brine also keeps the garlic cloves sharp longer.
- FRY IN BATCHES, LOW AND SLOW: Two or three pieces at a time in 350°F oil—crowd the pan and the temp drops, making the okra greasy instead of golden. Keep a thermometer handy; if the oil’s over 375°F, the outside burns before the inside cooks through.
- ADD A PINCH OF SUGAR: Just ½ teaspoon to the brine balances the vinegar’s sharpness and caramelizes the okra’s edges when frying. I was skeptical until I tried it—now it’s non-negotiable for that restaurant-style tanginess without overpowering the garlic.
Essential equipment for perfect results
Deep Fryer Essentials
For deep-frying pickled okra to golden perfection, a deep-fat fryer like the Presto 06300 makes this process foolproof. These appliances maintain consistent 350°F oil temperatures automatically, eliminating guesswork.
If you prefer stovetop frying, a heavy-duty Dutch oven (like All-Clad Stainless Steel) is ideal—it distributes heat evenly and handles the volume of oil needed. 🔥
Thermometer Accuracy
Never skip the instant-read thermometer—I swear by the ThermoWorks Thermapen ONE. It ensures your oil stays at 350°F (±5°F) for that perfect crispy texture. Oil that’s too cool makes greasy okra, while oil that’s too hot burns the coating before the okra cooks through.
Clip the thermometer to your fryer or Dutch oven handle so you can monitor it without risking burns.
Coating Prep Tools
Use a large shallow bowl (like a Corelle 10-inch dish) for tossing okra in the cornstarch-flour mixture. A fine-mesh strainer (such as OXO Good Grips) helps drain excess brine efficiently, preventing soggy frying.
For tossing, a pair of silicone-tipped tongs (like OXO Good Grips) keeps your fingers safe from hot oil splatter. 🌾
Draining & Serving Gear
After frying, transfer okra to a wire cooling rack (like Amazon Basics) to drain excess oil—this keeps it crispy, not greasy. For serving, a slate or wooden board (like Williams Sonoma’s options) adds rustic charm.
If prepping ahead, store fried okra in an airtight container with a paper towel to absorb moisture and maintain crispness for up to 2 days.
Budget-Friendly Swaps
No deep fryer? A large cast-iron skillet (like Lodge 10.25-inch) works perfectly for stovetop frying. Skip the thermometer? Use the cold-water test: Drop a small piece of okra into the oil—if bubbles form immediately, it’s ready.
For cornstarch, arrowroot powder (1:1 ratio) is a pantry-friendly alternative. A slotted spoon (like OXO’s) helps lift fried okra without breaking the coating.
Nutrition facts
Frequently asked questions
How long does pickled okra need to marinate before frying?
For best flavor and texture, let the okra marinate in the brine for at least 30 minutes, but up to 2 hours works even better. This ensures the okra absorbs the tangy, spicy flavors while staying tender enough to fry perfectly. Pro tip: If you're short on time, a 15-minute soak still works, but the flavor will be milder.
Can I use frozen okra instead of fresh?
Fresh okra is ideal for this recipe, but if you must use frozen, thaw it completely first and pat it very dry. Frozen okra releases more moisture, which can make the coating soggy. For best results, freeze the pickled okra (after marinating) in a single layer on a tray before transferring to a bag—this prevents clumping when frying.
Why is my fried okra not crispy?
Crispiness depends on three key factors: oil temperature (350°F is critical), proper draining, and a light, even coating. If your okra is greasy or soft, check if your oil was too cool or if you overcrowded the pan. Also, ensure the okra is completely dry before frying—excess moisture steams the coating instead of crisping it. For extra crunch, double the cornstarch in the coating.
What are the best ways to serve fried pickled okra?
This versatile dish shines as a side for sandwiches, a topping for salads, or a snack with dips like ranch, spicy mayo, or even hummus. It also pairs perfectly with grilled meats (like pulled pork or chicken) or as a crunchy addition to tacos. For a Southern twist, serve it alongside cornbread or collard greens. The tangy, crispy combo works with almost any meal!
Can I make the pickling brine ahead of time?
The brine keeps well in the fridge for up to 1 week—just store it in an airtight container. When ready to use, reheat it gently (don’t boil) and let it cool before adding the okra. This is a great time-saver for busy weeknights. For even longer storage, freeze the brine in ice cube trays and thaw as needed. Just remember to adjust the salt if you’ve had it chilling for a while.