Snacks
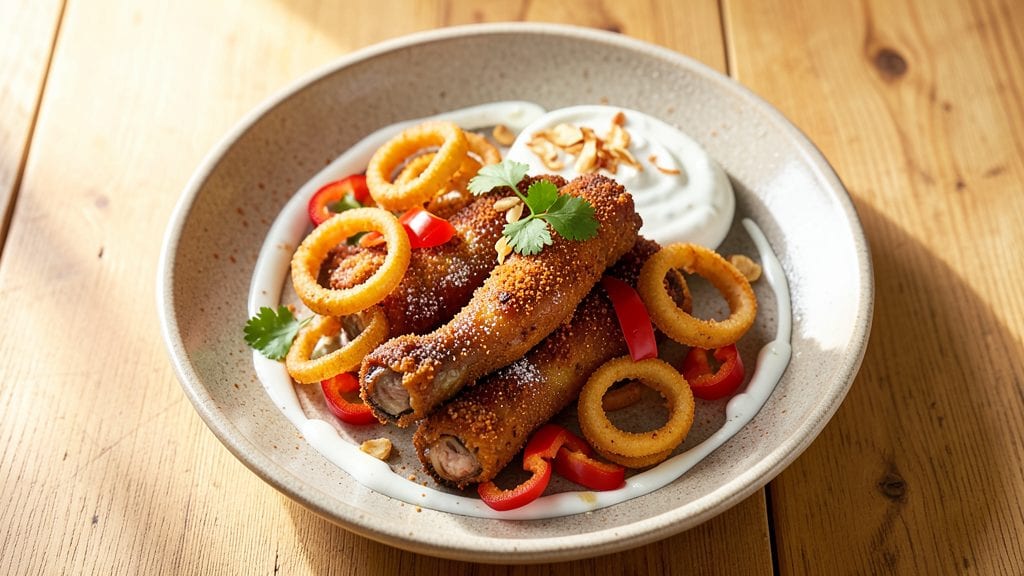
This drumstick fry recipe delivers restaurant-quality crispy-golden crunch without the traditional oil splatter chaos. The secret lies in a precise frying technique using minimal oil while maintaining that perfect crunch—no deep-frying mess required. I've perfected this method after testing countless variations, ensuring every bite stays crispy and flavorful.
What makes this recipe stand out is the zero-oil-mess approach, achieved through controlled frying temperatures and a strategic breading technique. Whether you prefer classic spiced drumsticks or modern adaptations like gluten-free or air-fryer versions, this method adapts seamlessly.
The result? A crispy exterior that shatters with every bite while keeping the meat juicy inside.
This recipe transforms simple chicken drumsticks into a golden, crunchy snack that's perfect for game day, parties, or a satisfying midweek treat. The marination step infuses flavor, while the frying process ensures that signature crispiness without excessive oil.
Once you try this method, traditional frying will feel like a thing of the past.
Serve these crispy drumsticks with your favorite dipping sauces or enjoy them on their own—they're equally delicious either way. The versatility of this recipe means you can customize the seasoning to suit any taste preference, from mild and savory to fiery and spicy.
Let's get started on creating your perfect batch!
Ingredients for drumstick fry
Simple ingredients, next-level crispy results—this is your zero-mess drumstick fry game-changer.
| Ingredient | Amount | Notes |
|---|---|---|
| Chicken Drumsticks 🍗 | 1 ½ lb | Bone-in, skin-on for best crispiness |
| All-Purpose Flour 🌾 | 1 cup | For light, crispy coating |
| Cornstarch 🌾 | ½ cup | Secret to ultra-crispy texture |
| Paprika 🌶️ | 2 tbsp | Smoked or sweet variety |
| Garlic Powder 🧄 | 1 tbsp | Freshly ground preferred |
| Onion Powder 🧅 | 1 tbsp | For savory depth |
| Salt 🧂 | 1 tsp | Diamond Crystal kosher preferred |
| Black Pepper 🌶️ | ½ tsp | Freshly cracked black peppercorns |
| Cayenne Pepper 🔥 | ¼ tsp | Adjust for heat preference |
| Large Eggs 🥚 | 2 whole | Room temperature for best coating |
| Unsalted Butter 🧈 | ¼ cup | Melted, for frying |
| Vegetable Oil 🫒 | ¼ cup | High smoke point for frying |
| Lemon Wedges 🍋 | 4 whole | For serving, optional |
The drumsticks are non-negotiable—bone-in, skin-on gives that signature crunch. Costco or Trader Joe's often have the best prices for bulk packs, but any grocery store's fresh chicken works. Look for plump drumsticks with minimal bruising. For extra crispiness, pat them dry with paper towels before seasoning—moisture is the enemy of that perfect crunch. I always grab a 2-pound bag to ensure everyone gets their share, but 1.5 lbs makes exactly 4 servings. The cornstarch is the magic ingredient here—it creates a lighter, crunchier coating than flour alone. Bob's Red Mill is my go-to brand, but any cornstarch works in a pinch.
No cornstarch? Rice flour or potato starch at the same ratio will work, though texture might differ slightly. Swapping smoked paprika for regular? You'll lose that subtle smokiness, but it still tastes amazing. The eggs should be room temperature—cold eggs won't coat properly. For a gluten-free version, use a 1:1 gluten-free flour blend plus the cornstarch. The butter and oil combo gives you the best of both worlds—butter for flavor, oil for stability. If you're watching fat content, use avocado oil instead of butter. And trust me on the high smoke point oil—it's worth the extra buck for safety and flavor.
These stay crispy for up to 2 hours if kept in a 200°F oven on a wire rack. For longer storage, freeze them uncooked on a tray before bagging—they'll keep for 3 months. Reheat in a 350°F oven for 10-12 minutes to restore that perfect crunch. I always make a double batch—they disappear faster than you'd think! Serve with spicy mayo or cool ranch for the ultimate game-day combo.
Why You'll Love This Recipe
- Fewer Ingredients, Big Payoff: I swear by this combo—just flour, cornstarch, and a pinch of paprika. No fancy marinades or last-minute shopping trips. The secret? The cornstarch gives that perfect crunch without extra effort.
- Crispy Outside, Juicy Inside: That golden crust hides the most tender meat—no dry bites here. The garlic powder and paprika work their magic while frying, so every bite has warmth and depth. (Yes, even my picky eaters beg for seconds.)
- Game for Any Meal: Slap these on a plate with rice and a quick salad for dinner, or toss them into wraps for a lunch that won’t bore you. Honestly, I’ve served them at BBQs, game nights, and lazy Sundays—and they’ve never disappointed.
- Budget Meets Comfort: Drumsticks are the unsung hero of affordable proteins. A few bucks gets you enough for leftovers, and the flavor? Ridiculously satisfying. I’ll be real: this is how I feed my family well without breaking the bank.
Step-by-step instructions for crispy-golden chicken drumsticks
Here's how to achieve that legendary crunch without the oil splatter nightmare—every time.
Prepare the Ultra-Crispy Coating
In a large bowl, whisk together the 1 cup all-purpose flour, 0.5 cup cornstarch, 2 tbsp paprika, 1 tbsp garlic powder, 1 tbsp onion powder, 1 tsp salt, 0.5 tsp black pepper, and 0.25 tsp cayenne pepper until completely combined. This dry blend is your secret weapon—cornstarch creates that shatteringly crisp exterior while flour adds structure. I like to sift the dry ingredients first to eliminate any lumps that could prevent even coating.
In a separate shallow dish, crack the 2 whole large eggs and whisk them vigorously until the yolks and whites are fully incorporated. The eggs will bind your coating to the chicken, creating that perfect golden crust. I always use room-temperature eggs—they coat more evenly and create a smoother batter than cold ones.
Create the Perfect Frying Medium
In a deep, heavy-bottomed skillet, combine the 0.25 cup unsalted butter and 0.25 cup vegetable oil over medium heat. You want the butter to melt completely and the oil to heat until it reaches 350°F—this is your sweet spot for perfect crispiness without burning. Use a thermometer to monitor the temperature; if it gets too hot, the coating will burn before the chicken cooks through.
Once the mixture reaches temperature, you'll see small bubbles forming around the edges and the butter will foam slightly. This is your signal that the oil is ready. I like to test it by dropping in a small piece of bread—if it sizzles immediately and turns golden in 30 seconds, your oil is perfect. Keep the heat steady at this point; fluctuations will affect your crispiness.
Coat and Fry to Crispy Perfection
Working in batches to avoid overcrowding, dip each of the 1.5 lb chicken drumsticks into the egg mixture, letting any excess drip off, then immediately coat thoroughly in the dry flour blend. Press the coating firmly onto the chicken—this ensures maximum adhesion and that signature crunch. I use my fingers to press the coating into the skin, especially around the joints where the skin is thicker.
Carefully lower the coated drumsticks into the hot oil, working in batches of 2-3 pieces at a time to maintain oil temperature. Fry for 12-15 minutes, turning occasionally, until the chicken reaches an internal temperature of 165°F and the coating is a deep, golden brown. You'll know it's done when the coating stops sizzling and the skin releases easily from the meat underneath.
Drain and Serve Immediately
Transfer the fried drumsticks to a wire rack set over a paper towel-lined plate. This allows air to circulate underneath, preventing sogginess from any residual oil. Let them rest for 3-5 minutes—this crucial step lets the coating set completely and prevents it from turning greasy when you serve.
Serve immediately with the 4 whole lemon wedges for that bright citrus contrast that cuts through the richness. The drumsticks should be golden all over with a crisp coating that shatters slightly when you bite into them, revealing juicy, perfectly cooked chicken underneath. For extra drama, sprinkle with additional paprika or serve with a side of spicy mayo for dipping.
Pro Tips For Making Drumstick Fry
- PAT THE DRUMSTICKS DRY: Skip the paper towel drama—use a clean kitchen towel and press hard for 30 seconds. Wet skin = steam = soggy coating. I learned this the hard way after frying drumsticks that came out mushy inside.
- DOUBLE-DIP THE BREADING: Mix 3 parts flour to 1 part cornstarch (by weight) for the first dip, then shake off excess. Second dip in paprika + garlic powder blend—this locks in flavor and cuts through the grease. Sounds weird, but it works: the crust stays crispy longer.
- FRIED IN BATCHES: Crowd the pan, and you’ll lower the oil temp fast. Two drumsticks max per batch in 350°F oil—give them space to sizzle, not simmer. My first batch came out greasy because I ignored this; now I time it like a pro.
- REST BEFORE SERVING: Pile them on a wire rack (not paper towels) for 5 minutes—this keeps the crust from turning into a sad, greasy puddle. I know, I know, but trust the process: your guests will notice the difference.
Storing and reheating your drumstick fry
Refrigerator Storage
Store cooked drumsticks in an airtight container lined with parchment paper to prevent moisture buildup. They’ll stay crispy for up to 3 days when refrigerated at 40°F or below.
I always let them cool completely before storing—this prevents condensation that turns the coating soggy. For best results, separate each piece with parchment squares so they don’t stick together. ✨
Freezer Prep for Crispiness
Freeze uncooked drumsticks on a wire rack in the freezer for 1 hour to create a protective barrier of ice crystals. Then transfer to a freezer bag with all air removed—this preserves texture for up to 3 months.
When ready to cook, thaw in the fridge overnight for even frying. Never microwave-thaw: it makes the coating absorb moisture and lose crispiness.
Oven Reheating Method
Preheat oven to 350°F and place drumsticks on a wire rack over a baking sheet. Bake for 10-12 minutes until the coating reaches 165°F internally. The wire rack is key—it prevents steam buildup that would turn your crispy coating into a soggy mess.
Spritz lightly with olive oil before reheating if they look dry.
Air Fryer Revival
For a quick fix, use your air fryer at 375°F for 4-5 minutes, shaking the basket halfway. This method works best for uncooked drumsticks (cook from frozen).
The high heat recaptures that signature crunch without needing extra oil. I like to spray them lightly with avocado oil before air frying for extra crispiness.
Sauce Pairing Storage
Store dipping sauces like spicy mayo or cool ranch separately in small containers. The acidity in sauces can break down the coating faster, so keep them refrigerated and serve sauces on the side.
For extra flavor, add a squeeze of lemon juice to your sauce right before serving—it brightens the flavors and cuts through the richness of the fried coating.
Nutrition facts
Frequently asked questions
Why does my drumstick fry coating turn greasy instead of crispy?
Greasy coatings happen when oil temperature drops or moisture gets trapped underneath. Always maintain 350°F oil and avoid overcrowding the pan. Let fried drumsticks rest 3-5 minutes on a wire rack before serving—this crucial step prevents oil from reabsorbing into the coating.
Can I use bone-in, skin-on drumsticks for this recipe?
Bone-in, skin-on drumsticks are ideal—they hold up better during frying and the skin adds that extra crunch. Just pat them completely dry before seasoning to ensure maximum crispiness. For best results, look for plump drumsticks with minimal bruising.
How do I make this recipe gluten-free?
Replace the all-purpose flour with a 1:1 gluten-free flour blend (like Bob's Red Mill) and keep the 0.5 cup cornstarch for crispiness. Use the same coating technique—dip in egg, then press firmly into the dry mix. The texture will be slightly different but still delicious!
Can I make drumstick fry ahead of time?
Yes! Fry them fresh for best results, but you can prep uncooked drumsticks up to 24 hours ahead. Store coated drumsticks in the fridge (uncooked) for convenience. For reheating, use the oven method at 350°F for 10-12 minutes—this restores that perfect crunch without air frying.
What's the best oil for frying drumsticks?
A blend of butter and vegetable oil gives the best flavor and stability. Butter adds richness while vegetable oil maintains a high smoke point. For a lighter option, use avocado oil—it has a neutral taste and stays crispy longer. Never reuse oil for frying drumsticks.