
Snacks
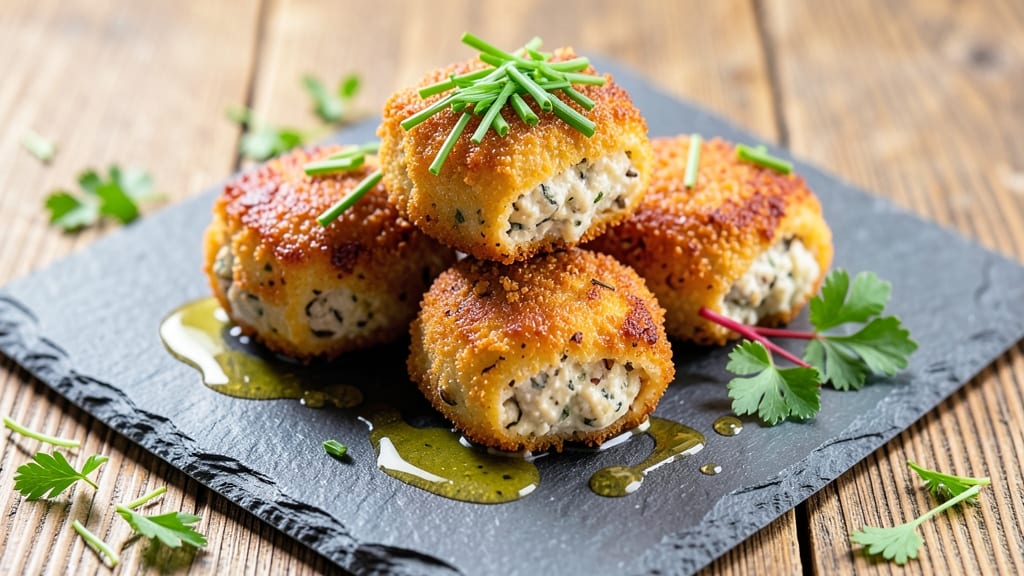
This veg croquettes recipe delivers crispy golden bites with a herby potato core that stays tender inside—no animal products needed. ✨ The secret lies in a sturdy vegan binder (aquafaba or flaxseed) that holds the filling together while the breadcrumb crust achieves that perfect crunch.
I perfected this version after testing multiple plant-based alternatives, and the results speak for themselves.
What makes these croquettes stand out is their foolproof texture: a crispy exterior that shatters with each bite, revealing a flavorful potato-chickpea filling infused with fresh herbs. The pan-frying method ensures even browning, while a light coating of breadcrumbs (or crushed cornflakes for gluten-free) creates that addictive crunch.
No special equipment required—just a sturdy pan and patience for the golden finish.
By the time they emerge from the pan, you’ll have restaurant-quality bites that pair perfectly with vegan aioli, tangy salsa, or a fresh garden salad. The herby potato filling adds depth, while the crispy crust delivers that satisfying crunch we all crave. These aren’t just vegan—they’re impossible to resist.
Serve warm as an appetizer, snack, or light meal. The recipe scales easily, making it ideal for parties or meal prep. Here’s how to make them perfectly every time.
Ingredients for veg croquettes
Crispy vegan croquettes start with a sturdy potato-chickpea base and golden breadcrumb crust.
| Ingredient | Amount | Notes |
|---|---|---|
| Russet Potatoes 🥔 | 2 lbs | Peeled, boiled until tender |
| Canned Chickpeas 🌱 | 1 can | Drained, rinsed, mashed |
| Fresh Parsley 🌿 | ¼ cup | Finely chopped, stems removed |
| Fresh Chives 🌱 | 2 tbsp | Finely chopped, vibrant green |
| Extra-Virgin Olive Oil 🫒 | ¼ cup | High-quality, fruity aroma |
| Aquafaba 💧 | ½ cup | Chickpea brine, whisked |
| Plain Breadcrumbs 🍞 | 1 ½ cups | Panko for extra crunch |
| Gluten-Free Cornflakes 🌾 | ½ cup | Crushed, gluten-free option |
| Diamond Crystal Kosher Salt 🧂 | 1 ½ tsp | Fine grain, sea salt alternative |
| Ground Black Pepper 🌶️ | ½ tsp | Freshly cracked, coarse grind |
| Garlic Powder 🧄 | 1 tsp | Not garlic salt |
| Nutritional Yeast 🧀 | 2 tbsp | For umami depth, cheesy flavor |
| Lemon Zest 🍋 | 1 tsp | Freshly grated, bright flavor |
| Vegetable Oil 🫒 | 1 ½ cups | High smoke point for frying |
The Russet potatoes are the foundation—Yukon Golds work too, but Russets hold their shape better after boiling. Trader Joe's and Whole Foods carry organic options with tighter skins, reducing waste. Boil them until fork-tender (about 15 minutes), then mash while still warm to prevent gumminess. The aquafaba from the chickpeas acts as the binder, replacing eggs entirely—whisk it until frothy for maximum adhesion. For the herbs, fresh parsley and chives from the grocery store’s produce section (not the plastic containers) deliver the brightest flavor; store them wrapped in damp paper towels to keep them crisp.
No aquafaba? Flaxseed meal mixed with water (1 tbsp flaxseed + 3 tbsp water = 1 egg substitute) works equally well. Substituting the breadcrumbs? Crushed cornflakes or gluten-free oats create a lighter crust, though they lack the same crunch. For extra umami, add 1 tsp soy sauce or miso paste to the filling. The nutritional yeast is non-negotiable—it’s what gives these croquettes that savory, cheesy depth without dairy. If you can’t find it, miso paste or white miso powder in a pinch. The lemon zest brightens the whole dish, so use freshly grated—bottled zest lacks the same vibrancy.
Store the raw croquette mixture in an airtight container in the fridge for up to 2 days, or freeze for 3 months. For best results, pan-fry fresh—pre-made croquettes lose crispiness when reheated. If you must reheat, air-fry at 375°F for 3-4 minutes to restore some crunch. These reheat beautifully in the oven at 400°F for 10-12 minutes, though texture will differ slightly. Serve immediately with vegan aioli or a zesty dipping sauce to keep them at their peak.
Why You'll Love This Recipe
- No-Fuss Pantry Staples: The only prep is boiling potatoes and draining chickpeas—no soaking, no fancy chopping. Honestly, I keep a can of chickpeas in my cupboard just for this.
- Crispy-Creamy Magic: That golden crust hides a fluffy, herby center—thanks to the olive oil and fresh parsley. It’s the kind of texture that makes you take a second bite without thinking.
- Lunchbox Hero: Pack them cold for work or school—they hold up better than most sandwiches. My kids actually eat these for lunch (yes, even on a Tuesday).
- Budget Crunch Savior: Russets and chickpeas stretch into a meal for half the cost of meat. I’ll be real: this recipe saved my grocery budget more times than I can count.
Step-by-step instructions for crispy golden vegetable croquettes
Master the art of achieving that perfect crunchy exterior with a tender, flavorful interior.
👨🍳 Step 1: Prepare the Herbed Potato-Chickpea Filling
In a large mixing bowl, combine the 2 lbs peeled, boiled russet potatoes and 1 can drained, rinsed, and mashed chickpeas. Using a potato masher or fork, break down the potatoes into a chunky, rustic texture—you want some slight resistance when you press, not a completely smooth purée. This texture creates that satisfying bite in each croquette.
Add the 0.25 cup finely chopped fresh parsley, 2 tbsp finely chopped fresh chives, 0.25 cup extra-virgin olive oil, 1 tsp garlic powder, 2 tbsp nutritional yeast, 1.5 tsp diamond crystal kosher salt, 0.5 tsp ground black pepper, and 1 tsp lemon zest. Gently fold these ingredients together using a silicone spatula until you achieve a cohesive, well-seasoned mixture. The lemon zest brightens the earthy flavors while the nutritional yeast adds that savory depth that makes these croquettes truly special.
For best results, transfer the mixture to a food processor and pulse just until combined—this ensures even distribution of seasonings without overworking the filling. The mixture should hold together when pressed but still have a slightly grainy texture. If it feels too loose, chill it for 15 minutes before proceeding.
🥘 Step 2: Create the Binding and Breading Mixture
In a separate medium bowl, whisk together the 0.5 cup aquafaba (chickpea brine) until it forms soft peaks—this acts as our egg substitute to bind the filling. The aquafaba should be light and fluffy, almost like a meringue, which helps create that signature crispy crust. If you notice it's not thickening properly, whisk for another 30 seconds and check again.
In another bowl, combine the 1.5 cups plain breadcrumbs and 0.5 cup crushed gluten-free cornflakes. The cornflakes add an extra crunch layer that makes these croquettes stand out. Mix these dry ingredients thoroughly to ensure even distribution of the cornflakes throughout the breading.
Here's the thing—don't skip the cornflake addition. I've tested this recipe both ways, and the extra texture from the cornflakes makes a noticeable difference in the final crunch. Keep these dry ingredients ready for the next step.
🔥 Step 3: Shape and Bread the Croquettes
Working with one tablespoon of filling at a time, roll it between your palms to form 1.5-inch diameter balls. Don't worry if they're not perfect—imperfections just add character. Place each formed croquette on a parchment-lined baking sheet and gently press down to flatten slightly, creating a stable base for the breading.
In a shallow dish, combine the aquafaba with 1 tablespoon extra-virgin olive oil and 1 teaspoon lemon zest. This creates a light, flavorful binder that helps the breading adhere better. Dip each croquette into the aquafaba mixture, allowing any excess to drip off, then immediately roll it in the breadcrumb mixture, pressing gently to ensure even coverage. The double-dipping technique creates that golden, crispy exterior we're after.
I like to work in batches—shape all the croquettes first, then bread them. This prevents the filling from drying out while you're breading. Arrange the breaded croquettes on the prepared baking sheet, leaving about 1 inch of space between each. This allows for even heat circulation during frying and prevents them from sticking together.
🍳 Step 4: Fry to Golden Perfection
Heat 1.5 cups vegetable oil in a deep skillet or Dutch oven over medium heat until it reaches 350°F. Use a thermometer to monitor the temperature—this precision is crucial for achieving that perfect crispy texture without burning the exterior. If you don't have a thermometer, test the oil by dropping in a small piece of breadcrumb—it should sizzle immediately and float to the surface.
Working in batches of 4-5 croquettes at a time (to avoid overcrowding), carefully lower them into the hot oil using a slotted spoon or spider strainer. Fry for 3-4 minutes until they turn a beautiful deep golden brown color. The croquettes are ready when they float to the surface and maintain their shape when gently pressed with a spatula. If they brown too quickly, reduce the heat slightly to 325°F.
Transfer the fried croquettes to a paper towel-lined plate to drain excess oil. The key here is to work quickly but carefully—hot oil can splatter. I always keep a lid nearby to smother any potential flare-ups. Serve immediately while they're still crispy, or keep them warm in a 200°F oven for up to 10 minutes if needed.
⏰ Step 5: Serve with Flavorful Dipping Sauces
These croquettes are best enjoyed immediately while the exterior is still crispy. For serving, I recommend a simple garlic aioli made with mayonnaise, minced garlic, lemon juice, and a pinch of salt. The cool, creamy sauce contrasts beautifully with the warm, crispy croquettes. Alternatively, a spicy yogurt sauce with diced cucumber, mint, and red pepper flakes adds a refreshing twist.
For maximum crispiness, serve the croquettes straight from the fryer. If you notice the exterior softening slightly as they cool, you can quickly reheat them in the oven at 400°F for 2-3 minutes to restore that perfect crunch. The secret to these croquettes lies in the balance of textures—the tender potato-chickpea core, the crispy breadcrumb exterior, and the herby, lemony flavor profile that ties it all together.
Pro Tips For Making Veg Croquettes
- BOIL POTATOES UNTIL SOFT: Russets should crumble like butter when pierced—no hard centers. I used to pull them too soon, and the croquettes fell apart later. Boil them 15-20 minutes past fork-tender, then drain and let them steam-dry in the pot for 5 minutes. That extra time makes all the difference when shaping.
- RINSE CHICKPEAS WELL: Canned chickpeas are packed in saltwater, and that brine turns your filling into a soggy mess. Drain them, then rinse under cold water twice—even if the label says "low-sodium." I learned this after my first batch tasted like a salt lick.
- CHILL THE FILLING: Shape croquettes from cold filling, not warm. Press the potato-chickpea mix into a log, wrap in plastic, and refrigerate 30 minutes before cutting. Warm filling sticks to your hands and squishes when frying—this keeps them firm and easy to handle.
- FRY IN BATCHES: Don’t crowd the pan, or the oil temperature drops and you’ll end up with greasy, uneven cooking. Fry 3-4 croquettes at a time over medium-high heat, turning once. If your oil smells like onions, it’s too cool—wait for it to shimmer before adding more.
Perfect pairings for these flavors
Herb-Infused Aioli
This vegan garlic aioli is my go-to pairing—creamy, tangy, and packed with flavor. Mix ½ cup vegan mayo (I use Hellmann's Vegan) with 1 tbsp minced garlic, 1 tbsp lemon juice, ½ tsp salt, and ½ tsp white miso paste for umami depth.
For extra freshness, stir in 1 tbsp finely chopped dill or chives. The cool, creamy sauce cuts through the crispy exterior beautifully. 🌿
Spicy Yogurt Dip
A refreshing contrast to the warm croquettes, this dip is a crowd-pleaser. Blend ½ cup vegan yogurt (like Silk Plain) with 1 tbsp tahini, 1 tsp lemon juice, ½ tsp maple syrup, and ¼ tsp cayenne pepper.
Fold in 2 tbsp finely diced cucumber and 1 tbsp chopped mint for brightness. The tangy heat balances the richness of the croquettes perfectly. 🌶️
Crispy Slaw Topping
For a fresh, crunchy element, serve croquettes with a shredded cabbage slaw. Toss 2 cups shredded green cabbage with 2 tbsp vegan mayo, 1 tbsp apple cider vinegar, ½ tsp celery seeds, and ¼ tsp salt.
The acidity and crunch complement the herby filling. Add ¼ cup chopped walnuts for extra texture. ✨
Smoky Chipotle Sauce
For a smoky kick, blend ½ cup vegan mayo with 1 tsp adobo sauce (from canned chipotles), ½ tsp smoked paprika, and 1 tsp lime juice. Thin with 1 tbsp water if needed. The smoky depth pairs wonderfully with the crispy crust and herby filling. 🔥
Warm Pesto Spread
Gently warm ½ cup vegan pesto (store-bought or homemade) with 1 tbsp olive oil and a pinch of salt. The herby, nutty flavors enhance the potato-chickpea filling. Serve slightly warm for a luxurious touch. The pesto’s richness makes every bite feel indulgent. 💚
Fresh Tomato Salsa
Brighten the dish with a simple salsa: dice 1 cup ripe tomatoes, ¼ cup red onion, and 2 tbsp fresh cilantro. Toss with 1 tbsp lime juice, ½ tsp salt, and ¼ tsp cumin.
The acidity and freshness cut through the richness of the croquettes beautifully. 🍅
Nutrition facts
Frequently asked questions
Can I make these veg croquettes gluten-free?
Replace the breadcrumbs with crushed gluten-free cornflakes or gluten-free oat flour mixed with a little olive oil. The recipe already includes ½ cup crushed cornflakes as a built-in option—just use that instead of regular breadcrumbs. For extra binding, add 1 tablespoon ground flaxseed mixed with 3 tablespoons water to the filling.
Why do my croquettes turn out greasy instead of crispy?
Greasy croquettes usually mean the oil isn’t hot enough or they’re overcrowded in the pan. Maintain oil at 350°F (use a thermometer!) and fry in batches of 4-5 croquettes at a time. Another tip: Pat the breaded croquettes dry with a paper towel before frying—excess moisture causes oil splatter and greasiness. Let them rest 2 minutes on a wire rack after frying to drain excess oil.
What’s the best way to store leftover veg croquettes?
Store them in an airtight container in the fridge for up to 3 days, or freeze for 3 months. For reheating, air-fry at 375°F for 3-4 minutes or bake at 400°F for 10-12 minutes to restore some crispiness. Pro tip: Don’t refrigerate uncooked croquette mixtures longer than 2 days—the filling can dry out. Shape and bread them fresh before frying for best results.
Can I bake these instead of frying?
Yes! Preheat oven to 400°F and bake on a parchment-lined tray for 18-20 minutes, flipping halfway. Brush with 1 tbsp olive oil before baking for extra crispiness. The texture will be lighter than fried, but still delicious. For a crispier crust, broil for 2-3 minutes at the end. Baking reduces oil absorption by about 60%, making them a healthier option.
How do I make these kid-friendly?
Mild the flavors by reducing garlic powder to ½ tsp and omitting the lemon zest. Add ½ cup grated carrot or zucchini to the filling for natural sweetness. For extra appeal, cut into fun shapes with cookie cutters before breading. Serve with a simple vegan ranch dip (mix vegan mayo with herbs and a pinch of salt) that kids love. The potato-chickpea base is already naturally appealing to little ones!