Soups & Stews
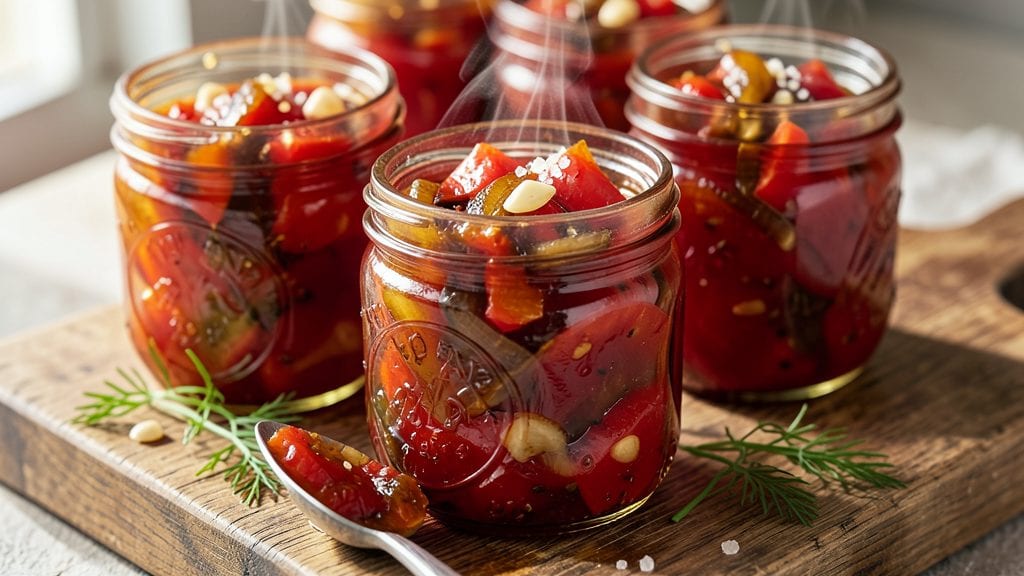
This canned tomato relish recipe transforms summer's bounty into a versatile condiment that keeps your pantry stocked for months. The process combines fresh tomatoes with vinegar, sugar, and spices to create a chunky, sweet-tangy relish that's perfect for sandwiches, hot dogs, or as a topping for grilled meats.
I've perfected this method over years of canning, ensuring safety and flavor in every jar.
The beauty of this recipe lies in its simplicity—just a handful of ingredients and basic canning techniques. You'll sterilize jars and lids, simmer the relish until thickened, and process the filled jars to create a shelf-stable product that tastes fresh out of the garden.
The result is a relish with vibrant color, balanced sweetness, and a satisfying crunch from the tomatoes.
What makes this relish special is its versatility—use it on burgers, hot dogs, or as a tangy topping for roasted vegetables. The canning process ensures you'll have homemade relish ready whenever you need it, without the need for fresh tomatoes.
Each batch yields about seven pints, making it ideal for gifting or stocking your pantry for the year ahead.
Safety is critical when canning, so I'll walk you through each step carefully, including proper sterilization and processing times. With this recipe, you'll enjoy the taste of summer all year long, knowing exactly what's in every jar. Let's get started on creating your own pantry staple.
Ingredients for canned tomato relish
Pantry staples meet summer's freshest tomatoes for a relish that lasts all year.
| Ingredient | Amount | Notes |
|---|---|---|
| Fresh Tomatoes 🍅 | 10 lb | Roma or paste variety preferred |
| White Vinegar 💧 | 2 cups | Distilled white vinegar only |
| Granulated Sugar 🍚 | 3 cups | White or raw sugar works |
| Onion 🧅 | 1 whole | Yellow or red, diced small |
| Garlic Cloves 🧄 | 4 cloves | Fresh, minced or finely chopped |
| Dill Pickle Juice 🥒 | 1 cup | From a jar of dill pickles |
| Mustard Seed 🌶️ | 1 tbsp | Yellow or brown seeds |
| Ground Black Peppercorns 🌶️ | 1 tsp | Freshly ground preferred |
| Salt 🧂 | 1 ½ tsp | Kosher or sea salt |
| Pint-Sized Mason Jars 🥫 | 14 whole | With two-piece lids, sterilized |
The tomatoes are the heart of this relish—Roma or paste varieties hold their shape best, but any firm, ripe tomato works. I always buy from local farmers markets when in season, but grocery store tomatoes are fine too (just avoid the mushy ones). For a sweeter relish, use slightly underripe tomatoes—they have less water content. If you're using heirlooms, peel and seed them first, but Roma tomatoes can go in whole. The vinegar and sugar ratio is key here—too much vinegar makes it tart, too much sugar makes it cloying. White vinegar is a must; apple cider vinegar changes the flavor profile.
No fresh dill pickle juice? Substitute with extra white vinegar plus 1 tsp dried dill. Running low on mustard seeds? Ground mustard at half the amount works in a pinch (though it won't have the same crunch). The onions and garlic can be swapped for green onions or shallots if you prefer, but classic yellow or red onions give that traditional tang. For a spicier kick, add 1/2 tsp cayenne pepper. The sugar can be reduced by 1/2 cup if you prefer less sweetness—just adjust the vinegar to keep the balance. And if you're worried about sterilizing jars, boiling them for 10 minutes in water does the trick.
This relish keeps for 12-18 months in a cool, dark pantry once processed. I always label my jars with the date—write with a marker on masking tape so it doesn't smudge. The first batch is always the best, but you can reuse the vinegar and spices for a second batch by adding 1 cup water. For gifting, I tie a red ribbon around the lids—looks festive and hides any imperfections. The relish thickens as it sits, so it's perfect for topping burgers, hot dogs, or even roasted potatoes. Freeze extras in ice cube trays if you won't use them all.
Why You'll Love This Recipe
- Here’s what sold me: the way the vinegar cuts through the sugar’s richness, then the garlic lingers like a warm hug. It’s the kind of flavor that makes you pause mid-bite.
- No Chopping Nightmare: I just toss halved tomatoes, minced onion, and crushed garlic into a pot—no dice, no fuss. That vinegar and sugar combo does the work while you sip your coffee.
- Sweet-Tart Magic: Here’s what sold me: the way the vinegar cuts through the sugar’s richness, then the garlic lingers like a warm hug. It’s the kind of flavor that makes you pause mid-bite.
- Pantry Staple Power: Slather it on hot dogs, mix it into deviled eggs, or drizzle it over grilled cheese. Honestly, I’ve even used it as a quick pasta sauce when I forgot everything else.
Step-by-step instructions for canned tomato relish
Transforming fresh tomatoes into homemade relish is easier than you think—just follow these simple steps.
Prepare and Sterilize Your Equipment
Start by thoroughly washing the 14 whole pint-sized mason jars and their lids in hot, soapy water. Place them in a large pot and cover with water. Bring to a boil for 10 minutes to sterilize—this prevents spoilage and keeps your relish fresh for months. Meanwhile, prep your tomatoes by cutting them into ¼-inch chunks and removing any cores or bruised spots.
While the jars sterilize, finely dice the 1 whole onion and mince the 4 cloves garlic cloves. Set them aside—they'll add depth of flavor to your relish. I like to use a sharp chef's knife for this step to ensure even cutting, which helps the relish cook uniformly. The onion should be small enough to dissolve slightly during cooking, while the garlic should be so finely minced it's almost unrecognizable.
Cook the Tomato Base
In a large, heavy-bottomed pot, combine the chopped 10 lb fresh tomatoes, 2 cups white vinegar, 3 cups granulated sugar, 1 cup dill pickle juice, 1 tbsp mustard seed, 1 tsp ground black peppercorns, and 1.5 tsp salt. Stir well to dissolve the sugar completely—this ensures even sweetness throughout the relish. Bring the mixture to a full rolling boil over medium-high heat, then reduce the heat to medium-low and let it simmer uncovered.
Let the relish cook for 45-60 minutes, stirring occasionally to prevent sticking and ensure the flavors meld. You'll know it's ready when the mixture thickens noticeably and the tomatoes soften but still hold their shape. The relish should coat the back of a spoon and have a glossy appearance. If it's not thick enough after an hour, continue simmering for another 15 minutes—patience here makes all the difference in texture.
Add Aromatics and Final Adjustments
Once the tomato base is thickened, stir in the diced onion and minced garlic. Let the mixture simmer for another 10 minutes, allowing the flavors to blend together. Taste and adjust the seasoning if needed—add more sugar if it's too tart, or a splash of vinegar if it's too sweet. The relish should balance sweet, tangy, and slightly spicy notes perfectly. This is your chance to fine-tune the flavor before canning.
Remove the pot from heat and let the relish cool for 10 minutes. Skim off any foam or scum that rises to the surface—this ensures your jars stay clean and your relish looks appealing. While the relish cools, prepare a clean kitchen towel and keep it handy for wiping jar rims later. The cooling step is crucial; it prevents the jars from cracking when you fill them with hot relish.
Fill and Seal the Jars
Using a large ladle or spoon, carefully ladle the hot relish into the sterilized pint-sized mason jars, leaving about ½-inch headspace at the top of each jar. Tap the jars gently on the counter to release any air bubbles trapped inside the relish. Use a clean, damp paper towel to wipe the rims of the jars—this ensures a proper seal. Place the lids on the jars and screw on the bands until they're fingertip-tight.
Return the filled jars to the pot of boiling water, ensuring they're fully submerged. Process the jars in the boiling water bath for 35 minutes to create a vacuum seal. This step is critical for long-term storage—it kills any remaining bacteria and preserves the relish for up to a year. After processing, carefully remove the jars with tongs and let them cool on a towel for 12-24 hours. You'll hear the satisfying "ping" of the lids sealing as they cool.
Store and Enjoy
Once the jars are completely cool and sealed, label them with the date and store them in a cool, dark place. Your homemade tomato relish will keep for up to 12 months if stored properly. The flavors will continue to develop over time, making it even more delicious as the months pass. Serve it on sandwiches, with cheese platters, or as a tangy topping for burgers—its versatility makes it a pantry staple.
When ready to use, open a jar and give it a good stir. The relish should be thick, glossy, and packed with sweet-tangy flavor. If it's too thick after opening, simply reheat it gently and stir until it reaches your desired consistency. The effort you put into canning will be rewarded with a relish that's far superior to anything store-bought.
Pro Tips For Making Canned Tomato Relish
- ROAST THE ONIONS: Toss sliced onions in 1 tablespoon of olive oil and roast them at 400°F (200°C) for 15-20 minutes until caramelized—this adds depth that raw onions can’t match. (Yes, it’s an extra step, but the sweetness cuts through the vinegar like magic.)
- SKIN THE TOMATOES: Blanching tomatoes in boiling water for 30 seconds, then shocking in ice water makes peeling effortless—no stubborn skins clinging to your relish. (I used to fight this for 10 minutes every time.)
- SIMMER GENTLY: Reduce heat to a bare simmer after adding vinegar and sugar, or you’ll end up with a thin, watery relish instead of a thick, jammy consistency. (Low and slow is the only way.)
- STRAIN THE GARLIC: Mash garlic cloves into a paste with a pinch of salt before adding them—this prevents chunks and lets the flavor distribute evenly. (Crushed garlic? You’ll taste every speck.)
Essential equipment for perfect results
Essential Canning Tools
First, you'll need pint-sized mason jars with two-piece lids—I recommend Ball or Kerr jars for their reliability. Grab 14 whole jars to yield about seven pints of relish. Don't forget a canning rack for your water bath pot to keep jars submerged safely.
A large, heavy-bottomed pot (at least 8-quart capacity) is crucial for processing—All-Clad or Le Creuset brands hold heat well. 🥫
Measuring & Mixing Gear
Accurate measurements matter! Use a kitchen scale for the 10 lb fresh tomatoes and a liquid measuring cup for the 2 cups white vinegar and 3 cups granulated sugar.
A sharp chef's knife (like Wüsthof) and cutting board help dice the 1 whole onion and mince the 4 cloves garlic cloves evenly. A wooden spoon prevents scratching your pot while stirring the relish.
Safety Must-Haves
Safety starts with sterilization. A large pot for boiling jars and a jar lifter (or tongs) protect your hands during hot transfers. Keep a clean kitchen towel handy for wiping jar rims before sealing.
A thermometer ensures your water bath reaches 180°F—critical for proper processing. I also keep rubber bands on hand to test seals by tugging after cooling.
Optional Upgrades
For flavor precision, a fine-mesh strainer helps remove tomato skins if you prefer smoother relish. A ladle with a long handle makes filling jars easier without spills.
If you love dill flavor, a small bunch of fresh dill (instead of pickle juice) adds brightness—just steep it in the hot relish for 10 minutes before removing. A label maker saves time when dating jars for storage.
Budget-Friendly Swaps
No fancy tools? A large stockpot works for processing, and aluminum foil can substitute for a canning rack by crumpling it into a base. Use plastic measuring cups for liquids and a serrated knife for dicing.
Even a wooden spoon from your kitchen drawer suffices for stirring. The key is sterilization—boiling jars and tools in water is free and effective. 💡
Nutrition facts
Frequently asked questions
Can I use canned tomatoes instead of fresh for this relish?
Fresh tomatoes give the best texture and flavor, but you can substitute with 28 oz canned crushed tomatoes (drained) if needed. The relish will be slightly softer, but the sweet-tangy balance remains. For extra chunkiness, drain the tomatoes and chop them slightly before adding to the pot.
How do I adjust the sweetness or tanginess for my taste?
Start with the recipe's measurements, then taste before canning. For more sweetness, add ½ cup sugar per pint jar after processing. For extra tang, add 1 tbsp vinegar per pint. The relish mellows slightly as it ages, so don't overcorrect—you can always adjust when serving.
Why did my relish turn out too thin?
Thin relish usually means insufficient cooking time. Simmer the mixture for 5-10 minutes longer until it thickens. If it's already canned, reheat the opened jar gently, stirring constantly until it reaches your desired consistency. For future batches, use Roma tomatoes (they have less water content than slicing varieties).
Can I add other vegetables to this relish?
Try adding ½ cup finely diced bell peppers or ¼ cup chopped jalapeños for extra flavor. Just cook them with the onions and garlic for 5 minutes before adding to the tomato mixture. For a crunchier texture, stir in ½ cup chopped celery or ¼ cup diced cucumbers during the final 10 minutes of simmering.
How long will homemade relish last before it spoils?
Properly canned relish keeps for 12-18 months in a cool, dark pantry. Once opened, refrigerate and use within 1 month. If you notice mold, off smells, or bubbles, discard it immediately—don't taste test! The vacuum seal should hold if stored correctly, but always check for bulging lids before opening.